前回解説したkindをより実践的なk8sクラスタとして構築したいと思います。
前回やったkindのインストールと1ノード(コンテナ)クラスタの構築だけでは「だから何なの?」という感じだと思います。
今回の構築で「実践環境での操作に慣れられる」「CKAの勉強に役立てられる」
そういった環境構築を目指していきましょう。
構築イメージ
構築する環境イメージは以下の通りです。
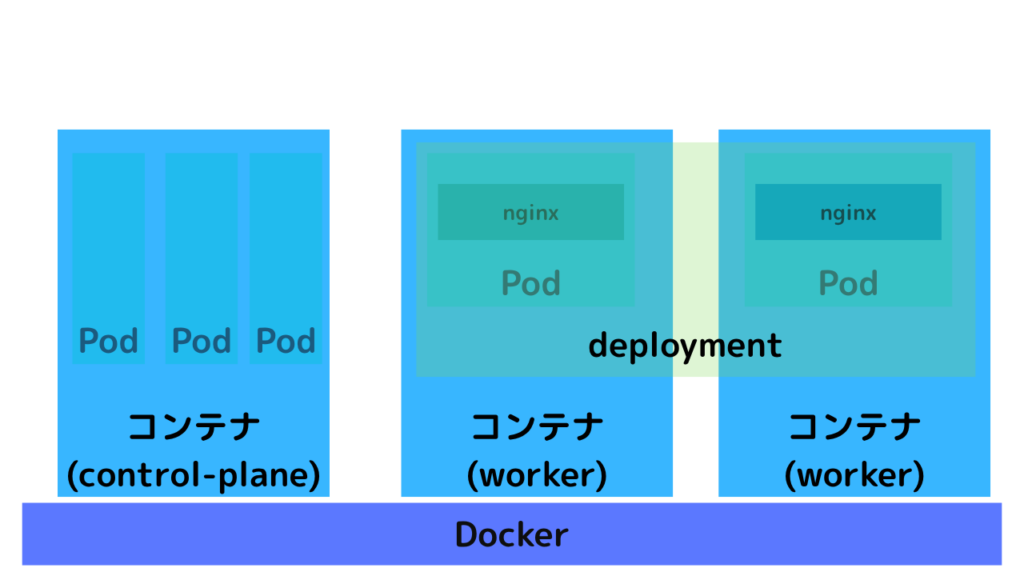
- ノード(コンテナ)は3台
- deploymentでpodを管理
構築方法
構築の流れは以下の通りです。
- クラスタノード(コンテナ)の構築
- ConfigMapの作成
- deploymentの作成
- serviceの作成
クラスタノード(コンテナ)の構築
今回構築するクラスタ用に作成したtest-cluster.yamlは以下の通りです。
kind: Cluster
name: test-cluster
apiVersion: kind.x-k8s.io/v1alpha4
nodes:
- role: control-plane
- role: worker
  extraPortMappings:
    - containerPort: 30080
      hostPort: 8080
      protocol: TCP
- role: worker
  extraPortMappings:
    - containerPort: 30080
      hostPort: 8090
      protocol: TCP
role: workerには外部公開用のportを設定しておきます。hostPortは重複しないように、ずらしました。
では構築コマンドを実行します。
$ kind create cluster --config test-cluster.yaml
Creating cluster "test-cluster" ...
 ✓ Ensuring node image (kindest/node:v1.33.1) 🖼
 ✓ Preparing nodes 📦 📦 📦
 ✓ Writing configuration 📜
 ✓ Starting control-plane 🕹️
 ✓ Installing CNI 🔌
 ✓ Installing StorageClass 💾
 ✓ Joining worker nodes 🚜
Set kubectl context to "kind-test-cluster"
You can now use your cluster with:

kubectl cluster-info --context kind-test-cluster

Have a question, bug, or feature request? Let us know! https://kind.sigs.k8s.io/#community 🙂
マシンスペックによっては数分かかりますが、構築が完了します。完了後、前回同様にノード(コンテナ)を確認してみましょう。
$ docker container ls
CONTAINER ID   IMAGE                  COMMAND                   CREATED         STATUS         PORTS                       NAMES
cda9b712b362   kindest/node:v1.33.1   "/usr/local/bin/entr…"   4 minutes ago   Up 4 minutes   0.0.0.0:8090->30080/tcp     test-cluster-worker2
a24f728b7732   kindest/node:v1.33.1   "/usr/local/bin/entr…"   4 minutes ago   Up 4 minutes   0.0.0.0:8080->30080/tcp     test-cluster-worker
f8c665349971   kindest/node:v1.33.1   "/usr/local/bin/entr…"   4 minutes ago   Up 4 minutes   127.0.0.1:52535->6443/tcp   test-cluster-control-plane

$ kind get kubeconfig --name test-cluster > .kube/config
$ alias k=kubectl
$ k get nodes
NAME                         STATUS   ROLES           AGE     VERSION
test-cluster-control-plane   Ready    control-plane   4m1s    v1.33.1
test-cluster-worker          Ready    <none>          3m51s   v1.33.1
test-cluster-worker2         Ready    <none>          3m51s   v1.33.1
コンテナとクラスタノードが同じ数、同じ名前で構築されていることがわかりますね。
ConfigMapの作成
続いて、nginxのpodに読み込ませるConfigMapを作成しておきます。
今回はnginxにアクセスした際にpod名、node名がわかるようにしたかったので、その部分は変数化しました。
apiVersion: v1
kind: ConfigMap
metadata:
  name: nginx-config
data:
  nginx.conf.template: |
    events {}
    http {
        server {
            listen 80;
            location / {
                default_type text/plain;
                return 200 "Hello from nginx!\nPod: ${POD_NAME}\nNode: ${NODE_NAME}\n";
            }
        }
}上記でConfigMapのnginx-configを作成できます。
nginxのコンフィグ設定については別記事も参考にしてみてください。

deploymentの作成
deploymentは以下のyamlで作成しました。
apiVersion: apps/v1
kind: Deployment
metadata:
  name: nginx-deployment
spec:
  replicas: 2
  selector:
    matchLabels:
      app: nginx
  template:
    metadata:
      labels:
        app: nginx
    spec:
      containers:
        - name: nginx
          image: nginx:alpine
          env:
            - name: POD_NAME
              valueFrom:
                fieldRef:
                  fieldPath: metadata.name
            - name: NODE_NAME
              valueFrom:
                fieldRef:
                  fieldPath: spec.nodeName
          command: ["/bin/sh", "-c"]
          args:
            - |
              envsubst < /etc/nginx/nginx.conf.template > /etc/nginx/nginx.conf && \
              nginx -g 'daemon off;';
          ports:
            - containerPort: 80
          volumeMounts:
            - name: nginx-config-volume
              mountPath: /etc/nginx/nginx.conf.template
              subPath: nginx.conf.template
      volumes:
        - name: nginx-config-volume
          configMap:
name: nginx-configConfigMapを持たせることや、環境変数を設定しenvsubstコマンドを実行してConfigMapに埋め込めるようにしています。
serviceの作成
deploymentを構築しただけではpodにアクセスできません。serviceを構築します。
apiVersion: v1
kind: Service
metadata:
  name: nginx-service
spec:
  type: NodePort
  selector:
    app: nginx
  ports:
    - port: 80
      targetPort: 80
      nodePort: 30080
serviceを構築することにより、今回のアクセスは以下の具合になります。
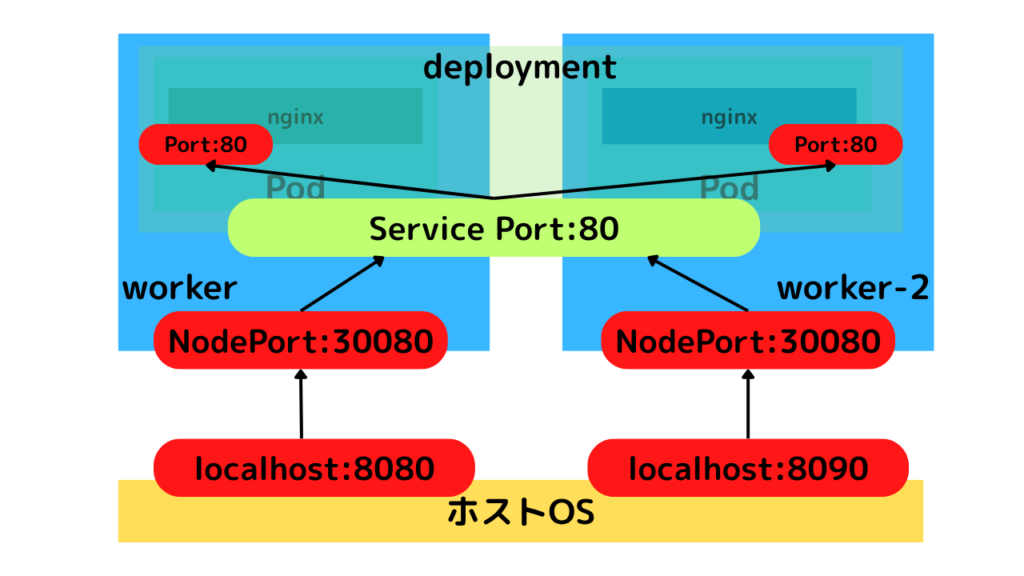
通信の流れは以下の通りです。
- ユーザーは
localhost:8080またはlocalhost:8090へアクセス - ポート番号ごとにいずれかのworkerノード(コンテナ)にアクセス
- いずれのwokerノード(コンテナ)もServiceの80ポートにアクセス
- Serviceがランダムにいずれかのpodにアクセス
よってlocalhost:8080、localhost:8090のいずれかにアクセスしても、アクセスするpodを指定できるわけではありません。
curl http://localhost:8080を何度か連打して、表示を確認してみてください。
ランダムでどちらかのpod, workerノードにアクセスできていることがわかります。
# 例
$ curl http://localhost:8080
Hello from nginx!
Pod: nginx-deployment-668b876768-5dt6k
Node: test-cluster-worker2

$ curl http://localhost:8080
Hello from nginx!
Pod: nginx-deployment-668b876768-j7wbc
Node: test-cluster-worker

$ curl http://localhost:8080
Hello from nginx!
Pod: nginx-deployment-668b876768-j7wbc
Node: test-cluster-worker

$ curl http://localhost:8080
Hello from nginx!
Pod: nginx-deployment-668b876768-j7wbc
Node: test-cluster-worker

$ curl http://localhost:8080
Hello from nginx!
Pod: nginx-deployment-668b876768-j7wbc
Node: test-cluster-worker

$ curl http://localhost:8080
Hello from nginx!
Pod: nginx-deployment-668b876768-5dt6k
Node: test-cluster-worker2
今回のように実践的なクラスタを構築できると、本番環境でのイメージが湧きやすくなります。またCKAやCKADの試験対策としても非常に有効なので、ぜひご自身の環境で試してみてください。